

How To Update Simucube 2 Wheels & True Drive
Simucube 2 wheels are among the very best premium direct drive racing wheels you can buy….

Disclaimer: Some of the links on this page may be affiliate links. We earn a commission from any sale after clicking an affiliate link. Find out more.
Creating the perfect car setup in F1 2020 can be a daunting task. There are a lot of options, and it isn’t always clear which option affects your car in a certain way. And which order you should adjust your setup.
This guide has been designed to run you through the best method of setting up your car. I will show you the overall order that I setup certain areas of our car. Along with what I look for when making setup changes in F1 2020.
Before I go any further, there is ultimately only one rule when it comes to adjusting your car setup in F1 2020. Only change one thing at a time!
I recommend only changing one individual setup option at a time because if you change multiple setup options at once. You wont necessarily know which setup option was the one which ultimately affected your car setup. This will make it hard to make future setup adjustments with confidence.
The guide below will run you through my whole process of creating a car setup in F1 2020. However if you want to read up on what each setup option does in F1 2020, read our complete F1 2020 setup guide here.
That guide will give you more of a technical understanding of each setup option, while this guide will show you how to create your setup from scratch.
When you first dedicate some time to creating an optimised setup, you need to have in mind your ultimate goal. Are you creating the setup for the fastest one lap in time trial mode. Or are you aiming for the most optimised race setup.
Having this in your head at the start will really help you narrow down your intended results and focus on achieving your goals.
For the purpose of this guide, I’m going to run through as though I’m creating a long distance race setup. So my main goals would be to achieve a stable and consistent car setup, with optimal tyre wear, and as much speed as I can safely achieve.
I would always recommend working on your car setups during a practice session opposed to time trial mode. This is because in time trial, everything is set to optimum. Track grip, tyre temps, and overall performance is all set to their highest setting. This will result in results which may not be replicated during a race session.
With your practice session, you should look for optimal and consistent weather conditions to give you the best baseline possible.
So jumping right in to the setup options. When I first approach any new setup, there are a few setup options that I change with confidence before I even step out on track.
Elements such as the brake pressure and brake bias get changed to roughly 98% brake pressures and 52% brake bias.
And then I also crank down the on-throttle diff setting to around 60%.
These are setup options which are very consistent across every car and track in F1 2020. This will give me a car which brakes how I expect it to, and isn’t too lively under acceleration. As with all options, these three settings are still open to being adjusted throughout the process and certainly aren’t set in stone.
Once I have made my initial setup adjustments above, I then take to the track for the first time. All other setup options other than the three above remain at default.
My goal on my first few runs are to dial in the best tyre pressures, before moving on to the camber and toe. In reality, the tyre pressures and suspension geometry are heavily linked.
All of these setup options affect your tyre temperature and ultimate tyre wear in F1 2020. Incorrect suspension geometry can have an affect on the optimal tyre pressure setting.
But let’s focus on one element at a time.
I’d recommend driving out on a setup of medium tyres, or hards if you want to drive a longer run. And while you are driving around, ensure you have your temperature HUD active on your MFD. You can do this by scrolling through the MFD, normally located behind the “B” button on Xbox or “Circle” button on PS4.
The main thing you should be looking for in regards to tyre temperatures is whether any tyre is overheating. If your tyre overheats during a race it will cause excess wear and a loss in performance.
The main culprits to excess tyre wear are high tyre pressures, excess load such as fast long corners similar to turn 1 and 2 at Suzuka, and aggressive suspension geometry.
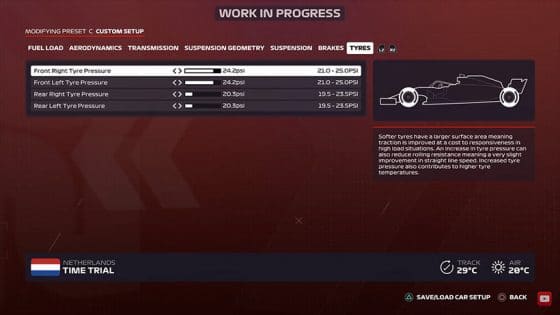
You should be aiming to setup your tyre pressures as high as you can get away with, while not overheating any tyre, and not getting too much wheel spin under acceleration.
In F1 2020, this is typically quite low. Almost all of my race setups in F1 2020 have low tyre pressures.
Anything over this and your tyre will wear at an increased rate.
Remember that you will generally require a few laps before your tyres reach their average temperature. All runs should be at least 4 or 5 laps.
Once you have completed a run, take note of which tyre overheats, and whether you are getting excess wheel spin under acceleration.
In the setup options, lower the pressure of any tyre which overheats consistently. You should also lower your rear pressures a click or two if you are getting excess wheel spin.
Once you have made tyre pressure changes, drive out for a second run and see whether all tyre temperatures are within an acceptable range. Keep making small adjustments as required, until you feel happy with your tyre temps.
Also try to keep your tyre pressures fairly balanced across each axle. You certainly don’t want your front left and front right on wildly different tyre pressures, as this will certainly cause issues in your setup balance.
Ultimately, once you have your full setup created, we’d recommend running a tyre wear program during career mode to get a good estimate to tyre wear.
Once you are happy with your tyre pressures, move swiftly on to your camber and toe. Again, these setup options will also affect your tyre temperature and wear rate.
So once you have adjusted your camber and toe, I’d recommend completing one final pass on your tyre temperatures and pressures just to ensure you haven’t compromised your tyre pressure setup.
Camber and toe can both be tricky to understand at first, especially given that F1 2020 doesn’t do a great job explaining camber due to its confusing min, max labels.
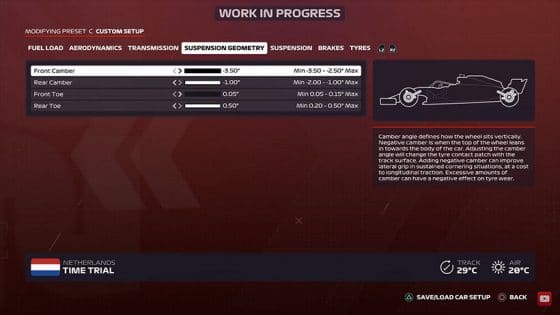
Ultimately, the lower the camber number (further left on the scale, and closer to -3.5) the more the top of your tyres are leaning towards your car. This is good for ultimate mid corner grip, however the closer to -3.5 you go the more tyre wear you will be susceptible to.
This is because the tyre has less contact patch with the road, meaning more stress is being put through a smaller part of the tyre, wearing it faster.
In F1 2020, generally the closer you set your camber to -2.5 (furthest right on the scale) the faster your car will be, and the better your tyre wear will be. This gives you the largest tyre contact patch with the road, distributing heat evenly, and giving you maximum traction.
Toe on the other hand dictates how straight your tyres are pointing. Run more toe, and your tyres will be pointing further out from your car. This gives you a more responsive car, at the expense of excess drag and tyre wear.
We would recommend initially setting your camber all the way right, and your toe all the way left for your first run on track.
For the majority of tracks this setup is pretty much the way to go. If you are confident with your tyre temperatures, your can start to move your camber bar further left. This will allow you to take corners with more speed, but will increase tyre temps and give you less ultimate traction.
In terms of toe, the lower the better generally. The lower the toe setup is, the more stable your car will be. Increasing both toe front and rear will make your steering feel lighter, and increased rear toe will help rotate your car at slower speeds.
The main downside of higher toe settings are excess drag. As the tyres would be effectively pointing away from your car, they drag across the track more, rather than driving the car straight forward.
This effect will compromise your top speed slightly, but more importantly will cause excess tyre temperatures.
Once you have setup your camber, toe and tyre pressures, run another 5 lap test to check on your tyre temperatures. Make any final tweaks required to optimise your pressures before moving on.
Moving on, your anti-roll bars are the next setup option to address. These are responsible for dictating how much your car rolls or leans during turning, acceleration and deceleration.
The softer your anti-roll bars, the more your car will roll, and the stiffer the less it will roll.
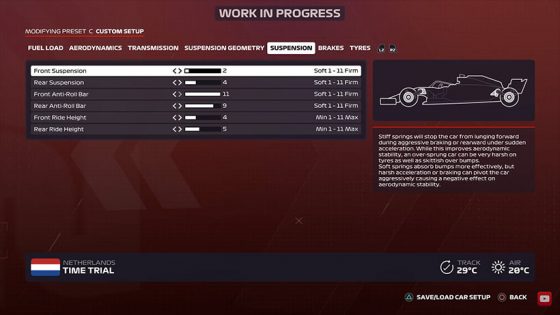
As a general rule of thumb, the stiffer your anti-roll bars are set, the more responsive your car will be during all inputs. This includes turn in responsiveness, but also livens up your rear end. Meaning your car will be prone to oversteering.
The main negative about having stiff anti-roll bars are that they will introduce more tyre wear the stiffer you go.
If you soften your anti-roll bars, your car will be more gentle on your tyres, meaning less wear, and more grip. But your car will start to feel unresponsive, and slow to turn in.
Typically, most tracks will require stiffer anti-roll bars, normally above 6, and sometimes right up to 10 or 11.
Another factor to think about when setting up your car for a certain track, is the track surface. If you are running on a bumpy track, stiff anti-roll bars will cause your car to bounce off of bumps, causing a lot of instability.
Whereas if you are driving on a smooth modern track, you can increase your stiffness.
We would recommend you start to increase your anti-roll bars a couple of points at a time, with your rear ARB set a point or two above your front. Keep doing this until the car starts to feel too twitchy, or you feel too much oversteer.
Again, once you have implemented any anti-roll bar changes, keep an eye on your tyre temperatures to account for any excess wear you have built in.
Once you have dialled in optimal tyre wear, and setup the chassis to behave in the way that you want it to. The next step is to dial in your aero, as this will be a big factor when it comes to overall lap time.
Ultimately, you will want to run as little aero as you can get away with. The lower your aero, the faster you will be in a straight line. However you will be compromising your cornering grip and speed.

Typically most circuits will require a higher rear downforce setup, and lower front. The rear doesn’t cause as much drag as front aero, and will be beneficial when trying to maintain mid corner speed.
The Best F1 24 Racing WheelsSo one of the first changes you should make is to lower the front by a couple of points, or alternatively raise the rear by a couple of points to create that offset.
Then either lower or raise both the front and rear aero in tandem to suit the track.
A fast circuit such as Monza or Spa will require lower downforce, while slower, more technical tracks such as Monaco will require much higher aero.
As mentioned the goal is to lower your aero as much as you can get away with, without losing speed through the corners. Generally it is more beneficial to run slightly lower downforce, than slightly higher. If you set too much downforce, you will be feeling the pain all through the race, as you’ll be slow on all straights.
If you are experiencing too much understeer, you can adjust your front wing up. And too much oversteer, increase your rear aero. Keep making small adjustments until you feel comfortable.
Keep an eye on your lap times, as they will go up and down as you make adjustments. You can fall in to the trap of setting your aero too high. Because high aero will almost always make your car feel nicer to drive. So just keep an eye on your lap times. Try and find the fastest (not necessarily the easiest to drive) aero balance.
The final options you should address are your suspension options. I’d recommend starting with your ride height before moving on to your overall suspension stiffness.
The goal with ride height is to lower it as much as you can before you start to encounter grounding, or bottoming out. This is where the bottom of your car scrapes along the road.
Typically you will want a slightly higher rear ride height compared to the front, which is called rake. Adding rake to your setup in F1 2020 does slightly increase drag, but will help produce more mechanical downforce. Great for the corners!
So offset your ride height by one point, with the front lower than the rear. Then start lowering it until you start to feel the vibrations from the road. As soon as you feel the road, you’ve gone too far, so bump it back up a little.
If your car is feeling overly twitchy over bumps, or unstable, you can always increase ride height a little to fix this.
Once you have achieved a good ride height setup, move on to your suspension stiffness. As a rule of thumb in F1 2020, you will want to run a soft suspension setup.
Quite often the quickest way around any track is to attack kerbs, and maximise your corner exit by driving over run off strips. To do this effectively without unsettling your car, you will want a soft setup.
Again, a good rule of thumb is to offset your suspension stiffness, with the front one or two points softer than the rear. This will help your car remain stable when you hit kerbs with your front axle.
I’d recommend lowering both front and rear suspension to the point where you can attack kerbs consistently. If you start to feel the car becoming a little twitchy or too lively over kerbs and bumps. Soften both front and rear suspension a little more until it becomes drive-able.
And that covers our general setup routine. Of course, once you have reached the end of this guide, and have setup all aspects of your car. There will almost certainly still be time to find.
You can do this by analysing how your car feels as you drive it. Then adjusting certain individual elements ever so slightly. If you feel an improvement after each adjustment, keep it. If you don’t, simply switch it back and try a different approach.
However, when creating a race setup, be constantly mindful of your tyre wear. This is one of the most important areas to optimise for race runs.
Once you feel happy, why not jump in to a quick race to test the setup across a race distance, and against the AI.
Once you start following the AI. You will also quickly realise areas of the track where you are either faster or slower. This can also help you make setup adjustments. For example, if you’re too slow in the straights. You can jump back in to the setup menu and reduce your aero.
Hopefully this guide will help you run through the process of creating a setup in F1 2020 from scratch.
I have one final note. If you are setting up your car for wet weather, there are a few key points where you will want to adjust your setup.
Mainly, you will want more grip on acceleration, and a generally softer, more forgiving car to drive. Below are a few areas to note for wet weather setups.
We have a complete guide for how to convert any dry setup to a wet setup here, if you fancy a read.
You can use the links below to shop for your favourite sim racing products, or for any products that we may have recommended. These links are affiliate links, and will earn us a small commission, with no additional cost for you.


Simucube 2 wheels are among the very best premium direct drive racing wheels you can buy….

While Assetto Corsa Evo is the new game on the horizon, the original Assetto Corsa remains…

The Simucube ActivePedal is a bit of a game-changer in its approach to how it works….